Drywall Repair Tips for Homeowners

Maintaining beautiful, damage-free walls is crucial for both the appearance and structural integrity of a home. Everyday activities and occasional accidents can take a toll on drywall, leading to unsightly cracks, holes, or dents. Fortunately, many issues can be resolved by homeowners who are equipped with the right knowledge and tools. For those interested in tackling projects themselves or understanding when to call for help, these interior wall repair tips will make the process much easier. Throughout this guide, you’ll find expert strategies and references to drywall repair professionals if advanced help is needed.
Understanding the types and causes of drywall damage helps homeowners prevent recurring issues, maintain their home’s value, and enhance their living comfort. Whether you’re fixing small nail holes or major patches, knowing the correct techniques can save time and costly mistakes. Mastering interior wall repair can make all the difference in sustaining the look and feel of any interior space.
Taking a proactive role in wall maintenance not only improves your home’s aesthetics but also ensures long-term durability. Simple repairs, when addressed promptly, can prevent more significant structural problems in the future. From selecting the right materials to achieving a flawless paint match, the details matter in any repair task.
If you’re looking for a broader understanding of drywall maintenance, knowing the basics will empower you to care for your home expertly—and recognize when a situation may require professional assistance.
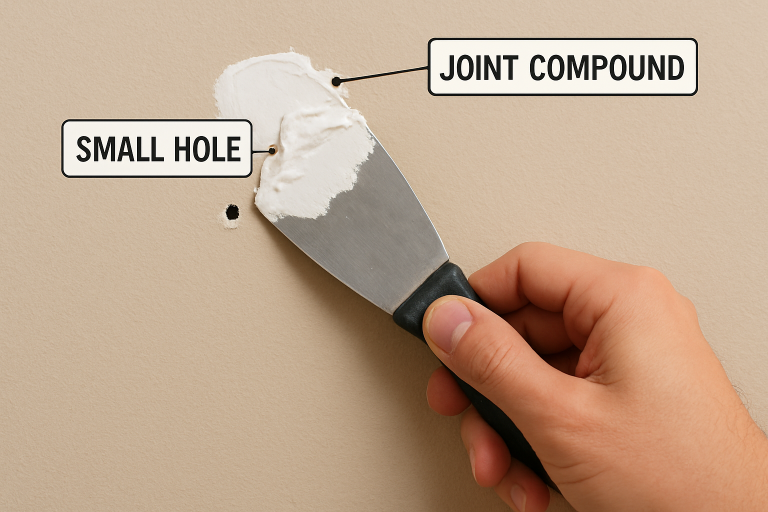
Table of Contents
Common Drywall Issues
Homeowners most frequently encounter several types of drywall damage. Recognizing each form allows for precise repair and prevention:
- Small Holes: These are typically caused by the removal or repositioning of nails, screws, or wall anchors.
- Cracks: Wall cracks can develop due to minor settlement of the house foundation or from fluctuations in temperature and humidity.
- Large Holes: Significant accidental impacts, such as from door handles or misplaced furniture, or necessary interventions like plumbing maintenance, can leave sizable holes behind.
- Nail Pops: As homes settle, nails may loosen, causing bumps or small holes to appear on the wall surface.
Identifying the specific issue you’re facing helps you determine the right materials and method for effective repair. For further insights into identifying and diagnosing drywall damage, consider reviewing resources from reputable home improvement authorities, such as This Old House.
Essential Tools and Materials
Before beginning any drywall repair, assembling a basic toolkit will make your work smoother and more professional. The essentials include:
- Utility knife for cutting clean edges
- Drywall saw for larger holes
- Putty knife for applying and smoothing compound
- Joint compound or spackling paste for filling gaps and holes
- Drywall tape (either paper or mesh) to cover seams and cracks
- Sandpaper (80- to 120-grit) for finishing work
- Primer and matching paint for final touch-ups
Selecting the best tools not only enhances the quality of the repair but also ensures your safety. Wearing a dust mask and safety glasses is recommended during sanding or cutting tasks to avoid inhaling dust and protect your eyes.
Step-by-Step Repair Guide
Repairing Small Holes
- Remove any loose debris or paint around the hole using a utility knife.
- Apply a small amount of spackling paste or joint compound with a putty knife, pressing it into the hole.
- Allow the compound to dry according to the manufacturer’s instructions.
- Sand the patched area until it is flush with the wall surface. Use a sanding block or a fine-grit sandpaper for the best results.
- Prime and paint over the repair to seamlessly blend it with the surrounding wall.
Fixing Cracks
- Widen the crack slightly using a utility knife to create a clean surface for the compound to adhere to.
- Fill the groove with a thin layer of joint compound.
- Embed drywall tape into the wet compound to reinforce the repair.
- Apply two or three additional thin coats of joint compound, feathering the edges outward to blend with the wall.
- Once dry, sand smooth and finish with primer and paint.
Addressing Large Holes
- Square off the hole with a drywall saw to remove damaged edges.
- Install a wooden backing board behind the hole for support, if necessary.
- Attach a new piece of drywall cut to fit the opening, screwing it into the backing board.
- Apply drywall tape along the seams, then cover with joint compound.
- Sand, prime, and paint once the finish is fully dry, matching it to the rest of the wall.
Handling Nail Pops
- Pull out the loose nail using the claw end of a hammer.
- Drive a drywall screw into the stud near the original hole for a more secure hold.
- Apply joint compound over the screw head and fill the hole left by the nail.
- After drying, sand flush with the wall, then finish with primer and paint.
Preventive Measures
Taking steps to protect your drywall saves time and money in the long run. Here are several effective precautionary measures:
- Keep indoor humidity in check (ideally 30-50%) to prevent cracking and warping.
- Use wall anchors specifically rated for the weight of items you are hanging.
- Swiftly address any leaks in your roofing or plumbing to fend off water damage and potential mold growth.
- Insulate exterior walls and weatherproof your home to reduce thermal expansion and contraction, a common cause of drywall cracks.
When to Call a Professional
Not every drywall repair is suitable for a DIY fix. Some scenarios require specialized tools or expertise, such as:
- Significant mold issues or widespread water damage.
- Cracks hinting at serious foundation or structural concerns.
- Situations where large sections of drywall must be replaced or refinished.
Consulting a professional ensures repairs are completed safely and in accordance with local codes. Professional contractors have access to commercial-grade materials and proven techniques, resulting in seamless and long-lasting outcomes.
Regular maintenance and occasional repairs help homeowners protect the investment they’ve made in their property. By staying alert to potential issues and knowing when to handle a project yourself versus when to seek assistance, you can ensure your family enjoys safe and attractive living spaces for years to come.
Conclusion
Maintaining drywall doesn’t have to be overwhelming—equipping yourself with the right knowledge, tools, and preventive practices can go a long way in keeping your walls strong and attractive. From patching small holes to managing larger repairs, homeowners can handle many tasks on their own while recognizing when a professional’s expertise is the smarter choice. By addressing issues early and staying proactive with wall maintenance, you not only preserve the beauty of your home but also protect its long-term value and structural integrity.