


How to Use a Roofing Hammer

A roofer’s skill with a roofing hammer makes all the difference between a solid roof and one that leaks and loses shingles. Nail guns are faster to use. Yet many residential roofers stick to their traditional roofing hammer or roofing hatchet because these tools give them better control and precision.
The magnetic roofing hammer stands out as a roofer’s most valuable tool. These advanced tools help speed up work and improve accuracy with their magnetic heads that hold nails steady. This feature becomes even more useful on steep roofs and spots that are hard to reach. Like this, a shingling hammer’s unique features such as gages that line up shingles are a better match for carpenters than nail guns.
This detailed comparison looks at both tools to help you pick between a roofing hammer and nail gun for your project. You’ll learn about each tool’s special features, strengths and limits. We’ll also guide you through choosing the right tool based on your roofing needs.
Table of Contents
Understanding the Tools: Roofing Hammer and Nail Gun
The roofing industry has two main fastening tools that do the same job in very different ways. You need to know the basic differences between a roofing hammer and a nail gun to get the best results, keep costs down, and make sure your roof lasts longer.
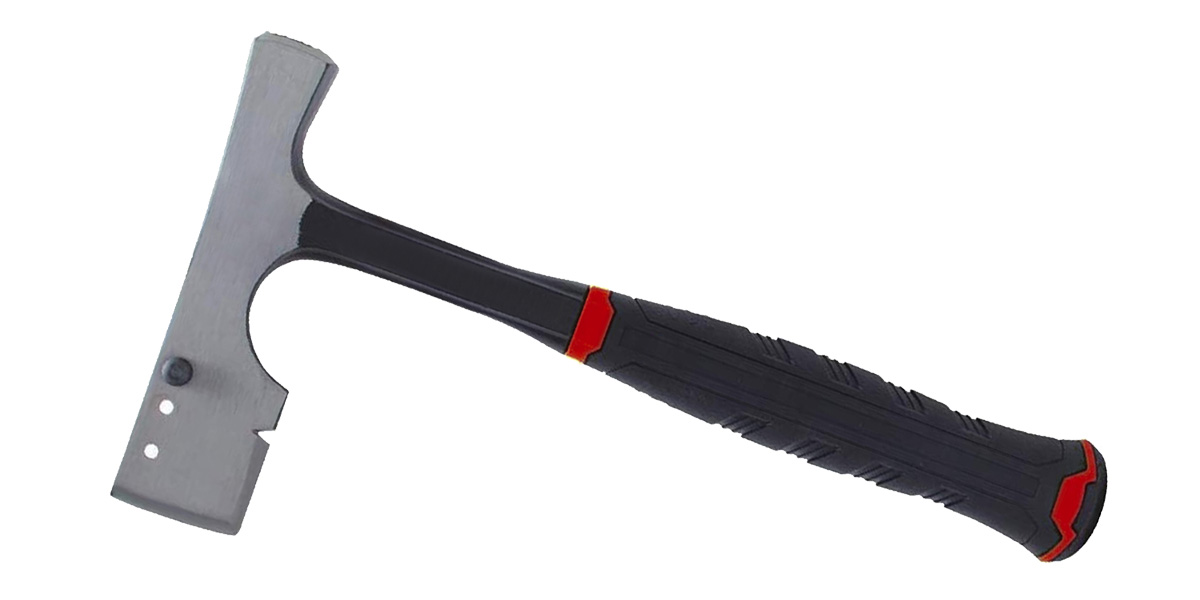
What is a roofing hammer?
A roofing hatchet stands out as a special tool made just for roofing work. This tool does much more than just drive nails, unlike regular hammers. The shingling hammer has a rough face that grips nails better than smooth-faced hammers, which helps place shingles more accurately on the roof deck.
A magnetic roofing hammer comes with these special roofing features:
- Built-in shingle gage to get the right exposure and spacing
- Magnetic face that picks up loose nails and holds them
- Blade edge to cut shingles
- Special claw to pull out old shingles and nails
- Notched head for exact shingle placement
The roof hammer comes with three handle options. Steel handles last longer but don’t absorb shock well. Wood handles feel comfortable and absorb shock well but don’t last as long. Fiberglass handles feel light and comfortable for long jobs. On top of that, newer roofing hammers with magnet often use titanium parts to cut down on vibration and hand tiredness.
What is a nail gun?
Nail guns show how pneumatic technology has changed construction work. These tools first appeared in the early 1900s and changed construction forever in the 1950s and 60s by making work much faster. The pneumatic roofing nailer uses compressed air to drive nails quickly and consistently.
Today’s roofing nail guns are light, easy to hold, and have angled magazines that work well in tight spots. They come as pneumatic (air-powered) or cordless electric models. Pneumatic ones work steadily but need an air compressor. Cordless models let you move around more freely but depend on battery power.
The core team looks at weight balance, depth adjustments, magazine size, and firing type when picking roofing nailers. Sequential-trip triggers are safer because you pull the trigger for each nail. Contact triggers work faster but might be more dangerous.
Why this comparison matters
Professional roofers still debate between hammer for roofing and nail guns because each tool affects quality, time, and cost differently. The choice between these tools comes down to speed versus precision.
Hand nailing with a roofers hammer lets experienced workers feel where nails go and adjust right away. This gives them better control and accuracy. Nail guns speed up installation and put nails at the same depth when fine-tuned properly. This can save money on bigger jobs.
The right tool depends on the job size, roof design, and worker experience. Small fixes work better with a roofing magnetic hammer. Full roof installations with bigger crews might get done faster with nail guns. Both tools work fine when used correctly, according to roofing manufacturers.
The way you fasten shingles directly affects how well your roof works and how long it lasts. A roof with badly driven nails risks losing shingles and leaking, whatever tool you used to put them in.
Key Features of a Roofing Hammer
A roofing hammer is different from regular hammers because of its special design that helps roofers work better and more accurately. Roofers need to know these unique features to pick the right tools for their jobs.
Magnetic face and nail holder
The magnetic face is one of the best additions to modern roofing hatchets. This feature holds nails firmly in place and lets you work with just one hand – really helpful on steep roofs. Magnetic roofing hammers use strong neodymium magnets right on the striking face. These work great for quickly putting in felt cap and roofing nails. You can place the nail on the hammer’s end and drive it exactly where you want without holding it. This cuts down the chance of hurting your fingers. The magnetic design also helps you reach tough spots that would be hard to get to otherwise.
Built-in shingle gage
Quality shingling hammers come with a built-in shingle gage that gives you perfect spacing every time. This tool helps create a clean, uniform look across your roof by measuring exactly what you need. Roofers can hook the pin on the bottom tile and use the hammer face as a guide to place the next shingle. You’ll get professional results with this feature, whether you’re working with asphalt or wood shingles.
Claw and cutting edge
A roofers hammer does more than your average hammer. The front has a milled face for nailing, while the back has either a claw or cutting edge. The special claw design makes it easy to pull out old or damaged shingles without needing extra tools. Many models also have a sharp edge that lets you cut shingles to size right there on the roof. Some newer models even add a utility blade to make cuts more precise.
Handle materials and grip
The handle material can make a big difference in how well your roof hammer works and feels. You’ll find three main types:
- Steel handles last forever but send more vibration to your hands
- Wooden handles (usually hickory) soak up shock well and feel great but don’t love bad weather
- Fiberglass handles give you the best mix of being light and tough
Today’s designs often include rubber grips that feel good and stay secure even when wet. This smart design means your hands won’t get as tired during long days of work.
Shock absorption and weight balance
Good balance and shock absorption help prevent tired arms during long roofing jobs. New shingle hammers use special materials that keep vibrations from reaching your hands and arms. A good roofing hammer with magnet puts most of its weight in the head where you need it for driving nails. The handle stays lighter. This design helps pros work all day without getting worn out or risking long-term arm problems from constant hammering.
Advantages and Disadvantages of Roofing Hammers
A contractor’s choice of the right roofing hammer depends on understanding its advantages and limitations for specific projects. Yes, it is important to think about both the unique benefits and challenges this traditional tool brings to roofing work.
Precision and control
The roofing hatchet gives users feedback that nail guns can’t match. Roofers feel the exact moment when nails hit the wood decking, which confirms proper fastening. This hands-on experience lets skilled professionals nail with perfect placement and depth every time. Hand nailing with a magnetic roofing hammer helps avoid over-driven nails – a common issue with poorly fine-tuned nail guns. The shingling hammer’s built-in gage makes consistent shingle exposure easier, which remains crucial for proper installation. These advantages in precision have sparked new interest in roofing hammer use. This creates a marketing edge for contractors working in high-end markets and high-wind areas.
Durability and low maintenance
A roof hammer just needs simple rust protection, unlike pneumatic tools. This makes the hammer for roofing reliable on job sites. Quality shingle hammers use high-strength materials like steel or titanium that last for years of heavy use. Contractors can pick handles based on their priorities – steel for durability, wood to absorb shock, or fiberglass for a lightweight feel.
Slower speed and fatigue factor
The roofers hammer takes more time than a nail gun to apply shingles, despite its precision benefits. Even experienced hand-nailers work slower, which raises labor costs and extends project times. Hammer weights from 14 to 28 ounces present a choice: lighter ones reduce arm fatigue but need more force per strike. Heavier options drive nails faster but tire arms sooner.
Learning curve for new users
New roofers just need patience and time to learn how to use a roofing magnetic hammer. Novices take 1-2 months to become accurate and confident with a magnet roofing hammer. Nail guns only take days to master. Some experts say nail guns pose bigger risks for serious mistakes due to their power. Most people already have experience with hammers.

Nail Guns: Pros and Cons for Roofing Projects
Professional contractors looking at tool options should know that nail guns are a compelling alternative to traditional roofing hammers. These pneumatic or cordless tools changed roofing work since they first appeared in the mid-20th century. They come with both benefits and drawbacks you should think about.
Speed and efficiency
Nail guns speed up roofing installations with their quick firing abilities. We completed projects by a lot faster than hand nailing methods. This boost in productivity leads to lower labor costs and quicker project completion, which saves money for roofing companies and their clients. Cordless models improve this efficiency even more because they eliminate tripping hazards from power cords. Business-minded contractors will find this time-saving feature a major advantage over traditional roofing hammers when they work with tight schedules.
Consistency in nail depth
Nail guns provide uniform pressure for driving nails when properly adjusted, which leads to consistent depth and placement. This uniformity creates a professional finish that seals better against water than manually driven nails. Quality nail guns come with adjustable depth settings that let roofers control nail penetration based on material thickness and framing type. This feature is a great way to get the manufacturer-specified installation standards right.
Maintenance and setup requirements
Unlike a magnetic roofing hammer, nail guns just need regular maintenance to work their best. Here’s what you need to do:
- Clean them daily to keep debris from clogging
- Use pneumatic tool oil for lubrication (never WD-40 or motor oil)
- Check worn parts like o-rings and driver blades regularly
The right air pressure settings matter too. Low pressure leaves nails under-driven, while too much pressure damages shingles. Pneumatic models need an air compressor, which means one more piece of equipment to maintain and move around.
Risk of overdriving or misfiring
The same power that makes nail guns efficient creates risks too. Most roofing contractors use pneumatic nail guns, but wrong pressure settings often drive nails too deep and punch through the shingle mat. These overdriven nails can void warranties and increase the chances of shingles coming loose during storms. On top of that, it takes different pressure settings as temperatures change throughout the day – something busy roofers might skip. Unlike a shingling hammer that gives you feel for each nail, nail guns might miss proper placement without you even knowing it.
When to Use Each Tool: Project Scenarios
Picking between a roofing hammer and nail gun really comes down to your project needs and conditions. Both tools shine in different situations, so you need to pick the right one to get the best results.
Small repairs vs full roof installations
A magnetic roofing hammer works best for small repair jobs. You’ll get better control and precision when you’re fixing a few shingles or patching damaged spots with a roofing hammer with magnet. The hammer won’t disturb the surrounding materials. Nail guns excel at full roof installations, especially on big commercial projects where faster work means lower labor costs. Most pro roofers pick pneumatic nailers for big jobs to work faster, while residential contractors often stick to manual tools for smaller fixes.
Steep slope or hard-to-reach areas
A roofing hatchet gives you better control on steep roofs, particularly those with 6/12 to 12/12 pitch. The magnetic feature on a good shingling hammer really helps on steep slopes because you can work with one hand while staying balanced. You’ll need special roof safety systems on very steep pitches (up to 14/12), whatever tool you choose. A roof hammer might work better than heavy nail guns with hoses or batteries in these tough spots.
Budget and time constraints
Nail guns make sense for time-sensitive projects with big budgets because they speed up installation substantially. A roofers hammer costs less upfront since you don’t need a compressor, power source, or special nails. The tradeoff is more labor hours. You’ll need to balance your equipment costs against potential labor savings.
Skill level and crew size
New crews might get better results with nail guns at first. They only take about two days to learn, compared to one or two months to master a roofing magnetic hammer. Skilled pros can work amazingly fast with a magnet roofing hammer after years of practice. Bigger crews often standardize on nail guns to keep quality consistent among workers with different skill levels.
Summing all up
Professional contractors need to choose between roofing hammers and nail guns for modern roofing projects. The magnetic roofing hammer’s precision and tactile feedback stand out without doubt. This traditional tool helps roofers sense the exact moment a nail penetrates the roof deck. The result ensures optimal installation quality, especially on steep slopes and challenging areas.
Nail guns shine through their speed and efficiency. These tools prove valuable when time matters on large-scale installations. Project timelines shrink dramatically while the nail depth stays consistent with well-adjusted and maintained equipment.
Several critical factors determine the choice between these tools. The project’s scope makes a big difference – small repairs work better with a roofing hatchet’s versatility. Full roof installations might need a pneumatic nailer’s speed. The roof’s pitch also affects tool selection because steep slopes work better with a magnetic hammer’s one-handed operation.
Budget plays a key role in the decision. Nail guns need more upfront investment and regular maintenance costs. Yet they can make up for these expenses by cutting down labor hours. Shingling hammers cost less to buy but might extend the project’s duration.
Smart contractors know proper training remains crucial. Beginners might learn nail guns faster, but hand nailing with a roofing hammer rewards those who take time to practice. Many professional roofers use both tools to maximize efficiency and quality in projects of all sizes.
The client’s priorities should shape the final choice. Some homeowners ask for hand-nailed roofs because they believe in their quality advantages, especially in high-wind areas or premium markets. Contractors who offer both options gain a competitive edge and meet their clients’ needs profitably.
Here are some FAQs on how to use a roofing hammer:
How to use a roofing hammer?
A roofing hammer is specifically designed for roofing projects with features that make installation easier. When using a roofing hammer with magnet, the magnetic head helps position nails precisely before hammering. The unique head shape of a yellow hammer roofing or blue hammer roofing tool allows for both driving nails and adjusting shingles efficiently.
How to properly use a hammer?
To properly use any hammer including a roofing hammer, grip the handle firmly near the end for maximum swing control. With a magnetic roofing hammer, you can use the magnetized face to start nails before driving them completely in. Whether using a yellow hammer roofing tool or standard hammer, always strike the nail head squarely to avoid bending.
How do you do the hammer nail technique?
The hammer nail technique involves holding the nail at the correct angle and striking it with controlled blows. A roofing hammer with magnet makes this easier by temporarily holding the nail in place during initial strikes. For roofing work, tools like blue hammer roofing are ideal as their specialized heads help set nails flush without damaging surrounding materials.
How to hammer down shingles?
To hammer down shingles, use a specialized roofing hammer that won’t tear the asphalt material. The magnetic roofing hammer is particularly useful as it can hold roofing nails while positioning them under shingle tabs. Whether using yellow hammer roofing or other specialized hammers, drive nails straight in until they’re flush with the shingle surface.
How to use a hammer arrestor?
A hammer arrestor is actually a plumbing device, not related to roofing hammer tools. However, when working with roofing hammers like the blue hammer roofing or magnetic roofing hammer, always use proper safety techniques. For actual hammer arrestors in plumbing systems, they’re installed to prevent water hammer effects in pipes.
What is the difference between a roofing hammer and a regular hammer?
The main difference is that a roofing hammer with magnet has specialized features for roofing work, unlike regular hammers. Roofing hammers like yellow hammer roofing or blue hammer roofing typically have a square head with a hatchet edge for cutting shingles. They also often include a magnetic nail holder and gauge markings that standard hammers lack.

