How to Pick the Perfect Pro: Questions for Floor Sanding Contractors

Table of Contents
- 1 Understanding the Scope: What a Professional Refinishing Job Entails
- 2 Vetting Potential Floor Sanding Contractors: Credentials and Experience
- 3 Materials and Methods: A Deep Dive into Your New Floor’s Finish
- 4 Project Logistics: Timeline, Preparation, and Cost
- 5 Frequently Asked Questions about Hiring Flooring Professionals
- 6 Conclusion: Making the Final Decision
Understanding the Scope: What a Professional Refinishing Job Entails
 Hardwood floors bring timeless beauty and warmth to any home. Over time, however, daily wear and tear can leave them looking dull, scratched, or even damaged. When your once-stunning floors start showing their age, professional refinishing can restore their original luster and extend their lifespan.
Choosing the right expert for this job is a big decision. A high-quality refinishing project protects your investment and improves your home’s value. But with many options available, how do you find a contractor you can trust?
That’s where this guide comes in. We understand the importance of making an informed choice. We’ll walk you through the key questions to ask potential floor sanding contractors. This will help you evaluate their experience, methods, and commitment to quality. For a more detailed look at the process, consider exploring a comprehensive floor sanding contractors guide. By the end, you’ll feel confident hiring the perfect professional to bring your hardwood floors back to life.


Before delving into contractor selection, it’s crucial to understand what professional hardwood floor refinishing entails. This process is far more involved than simply applying a new coat of polish; it’s a meticulous restoration that breathes new life into your floors.
The main stages involved in refinishing hardwood floors typically include:
- Preparation: This initial step involves thoroughly cleaning the area, removing all furniture, rugs, and any existing floor coverings. Professionals often advise homeowners to remove baseboards and even doors to ensure a seamless finish and prevent damage.
- Sanding: This is the core of the refinishing process. Contractors use specialized sanding machines with progressively finer grits of sandpaper to remove the old finish, stains, and any surface imperfections like scratches, dents, and discoloration. The goal is to get down to the bare, raw wood. This stage also allows for necessary repairs, such as replacing damaged boards or addressing squeaks.
- Dust Containment: While traditional sanding was notoriously messy, modern techniques and equipment significantly reduce dust. We’ll explore this in more detail shortly.
- Staining (Optional): Once the floor is perfectly smooth and clean, a stain can be applied to change the wood’s color. This allows homeowners to achieve a new aesthetic or match existing flooring in other rooms.
- Sealing and Finishing: Multiple coats of a protective finish (like polyurethane) are applied. Each coat is typically buffed lightly between applications to ensure adhesion and a smooth surface. This finish protects the wood from future wear and tear, moisture, and UV damage, while also providing the desired gloss level.
Recoating vs. Full Refinishing
One common question homeowners have is whether their floors need a full refinish or if a simpler recoating (also known as resurfacing) will suffice. Understanding the difference is key to choosing the right service and managing expectations.
- Recoating/Resurfacing: This process involves lightly abrading the existing finish (buffing) and then applying a new top coat. It does not involve sanding down to bare wood. This is ideal for floors with surface-level wear, light scratches, or a dull appearance where the existing finish is still largely intact and there’s no deep damage to the wood itself. It’s a faster, less invasive, and more affordable option, often recommended every 3-7 years to maintain the floor’s protective layer and shine.
- Full Refinishing: This is the comprehensive process described above, where the floor is sanded down to the bare wood. It’s necessary when floors have deep scratches, gouges, significant discoloration, water damage, or when you want to change the stain color entirely. Full refinishing restores the wood’s original beauty and provides a fresh, durable protective layer.
Can hardwood floors be refinished without sanding? Yes, under specific circumstances. If your floors only show minor surface wear, dullness, or light scratches that haven’t penetrated the existing finish, a “buff and recoat” can refresh their appearance without full sanding. However, this method won’t work for deep damage, significant discoloration, or if you wish to change the wood’s stain color. For a deeper understanding of the processes involved in restoring your floors, exploring resources on floor sanding and polishing can be highly beneficial.
The Promise of Dust-Free Sanding
One of the biggest concerns homeowners have about floor refinishing is the mess, particularly the dust. Historically, sanding created a pervasive layer of fine wood dust throughout the home. However, advancements in technology have revolutionized this aspect.
Modern floor sanding contractors often use advanced sanding machines equipped with powerful vacuum systems and HEPA filters. These systems capture over 95% of the dust produced instantly, often claiming to be 99% dust-free. This significantly reduces airborne particles, minimizing cleanup for homeowners and creating a healthier environment, especially for those with allergies or respiratory sensitivities.
The advantages of dust-free sanding include:
- Cleaner Home: Less dust means less mess to clean up after the project, making the transition back into your home much smoother.
- Healthier Environment: Reduced airborne dust improves indoor air quality, which is beneficial for everyone, particularly children and pets.
- Better Finish Quality: Less dust settling on the wet finish results in a smoother, more pristine surface.
- Faster Project Completion: Without extensive post-project cleaning, the overall timeline can be more efficient.
When discussing the process with potential contractors, always inquire about their dust containment methods. Many offer dust-free floor sanding services as a standard practice. If you’re specifically looking for this service, you might search for a provider offering dust-free floor sanding near me.
Vetting Potential Floor Sanding Contractors: Credentials and Experience
Choosing a floor sanding contractor is a significant decision that impacts both your home’s aesthetics and your wallet. We believe that thorough vetting is paramount. Don’t simply go with the first quote you receive. Instead, engage in a comprehensive due diligence process to ensure you’re hiring a reputable and skilled professional.

Essential Questions for Floor Sanding Contractors
When interviewing prospective contractors, prepare a list of questions that cover their experience, qualifications, and operational procedures. Here are some essential queries:
- “Are you licensed and insured?” This is non-negotiable. Verify that the contractor holds all necessary business licenses and, crucially, carries both liability insurance (to cover any damage to your property) and workers’ compensation insurance (to protect their employees and you from injury claims).
- “How many years have you been in business, and what is your experience with my specific type of wood flooring?” Longevity in the industry often indicates reliability and expertise. More importantly, ask if they have experience with your specific hardwood species (e.g., oak, maple, pine) as different woods require different sanding techniques and finishes.
- “Can I see a portfolio of your past work, and can you provide references?” A strong portfolio showcases their craftsmanship. Ask for references from recent clients and actually call them. Inquire about their satisfaction with the work, adherence to timelines, communication, and professionalism. Many reputable contractors will have an impressive portfolio available, such as those found on a company’s project page.
- “What are the main stages involved in your refinishing process?” A knowledgeable contractor will clearly articulate each step, from preparation and sanding to staining and finishing, including the number of coats they typically apply. This helps you understand their methodology and compare it across different bids.
- “What are your dust containment measures?” As discussed, dust is a major concern. Ask about their specific equipment (e.g., HEPA-filtered vacuums, sealing off rooms) and how they minimize dust in your home.
- “How does the local climate affect the refinishing process and the long-term durability of my floors?” For example, in a climate like Chicago, where humidity fluctuates significantly, wood floors can expand and contract. A seasoned contractor will understand these nuances and adapt their techniques and material choices to ensure optimal results and longevity in your regional climate.
- “What are the benefits of refinishing old hardwood floors versus replacing them?” A good contractor will be able to articulate the significant cost savings (refinishing typically costs $3-$8 per square foot, while new installation can range from $6-$12 per square foot for labor and materials), environmental benefits, and the ability to preserve original character.
- “What are the popular stain color options for hardwood floors, and how do they affect the overall aesthetic?” Discuss current trends (e.g., natural, gray, dark walnuts) and how different stains can complement your home’s decor. Ask to see samples on your actual wood if possible, as stain absorption varies by wood species.
- “What are the differences between recoating/resurfacing and full refinishing, and which do you recommend for my floors?” A professional will assess your floors and explain the best approach based on their condition, not just push for the most expensive service.
- “What is the typical timeline for a professional hardwood floor refinishing project?” Get a clear estimate. Small to medium rooms (200-500 sq. ft.) typically take 2-3 days, while larger areas (500+ sq. ft.) may take 4-5 days or more, especially with additional repairs or custom staining.
- “How does the cost of refinishing hardwood floors compare to installing new ones?” As mentioned, refinishing is significantly less expensive. The average cost to refinish hardwood floors is $1,900, ranging from $600 to $4,500, compared to installing new hardwood floors at an average of $4,800, ranging from $1,000 to $12,000.
- “What are the signs that indicate hardwood floors need refinishing?” They should point out signs like deep scratches, gouges, widespread dullness, discoloration, water damage, or areas where the finish has worn through to the bare wood.
Reviewing Contracts from Floor Sanding Contractors
Once you’ve narrowed down your choices, carefully review the proposed contract. This document should be detailed and transparent, protecting both parties.
Key considerations when paying a contractor to refinish hardwood floors include:
- Itemized Estimate: The contract should clearly break down all costs, including labor, materials (sandpaper, stains, finishes), and any additional services like repairs, baseboard removal/reinstallation, or furniture moving. Be wary of vague “all-inclusive” prices.
- Cost per Square Foot: Ensure the price per square foot for traditional refinishing ($3-$8) or dustless refinishing ($5-$8) is clearly stated and matches your understanding.
- Payment Schedule: A reputable contractor will typically require a deposit (often 30-50%) upfront, with the remaining balance due upon satisfactory completion of the work. Avoid contractors who demand full payment upfront.
- Material Specifications: The contract should specify the brand and type of finish (e.g., Bona Traffic HD, Minwax stains) and the number of coats to be applied.
- Written Contract Details: All agreements, including timelines, scope of work, and cleanup procedures, should be in writing. Do not rely on verbal promises.
- Change Order Process: Understand how unexpected issues or changes to the scope of work will be handled and priced.
- Warranties: Inquire about warranties on both materials and workmanship. A good contractor will stand behind their work.
Materials and Methods: A Deep Dive into Your New Floor’s Finish
The choice of finish and stain significantly impacts the final look, durability, and maintenance of your hardwood floors. Understanding these options will empower you to make informed decisions with your chosen contractor.
Choosing the Right Finish for Durability and Style
The finish protects your hardwood floors and defines their aesthetic. The most common types are oil-based and water-based polyurethane, with hard-wax oils gaining popularity.
- Feature Oil-Based Polyurethane Water-Based Polyurethane Durability Very durable, often considered slightly tougher Durable, especially newer formulations (e.g., 2-component) Dry Time Longer (8-12 hours per coat); longer cure time (30 days) Faster (2-4 hours per coat); faster cure time (7-14 days) Odor/VOCs Strong odor, higher VOCs Low odor, lower VOCs Color/Ambering Ambers over time, giving a warm, golden hue to the wood Clear, non-yellowing; maintains natural wood color Cost Generally less expensive Generally more expensive Oil-Based Polyurethane: Known for its rich, ambering effect that deepens over time, giving a traditional warmth. It’s highly durable but has a strong odor and high VOCs (volatile organic compounds), requiring longer ventilation and cure times.
- Water-Based Polyurethane: A popular choice for its low VOCs, minimal odor, and faster drying times. It dries clear and doesn’t yellow, preserving the natural color of the wood. Newer formulations, especially two-component systems, offer excellent durability comparable to oil-based options. For those concerned about indoor air quality, exploring options for non-toxic floor sanding can be a priority.
- Hard-Wax Oil: A natural, eco-friendly option that penetrates the wood rather than forming a surface film. It offers a matte, natural look and is easy to repair locally without needing to refinish the entire floor. It’s durable but may require more frequent maintenance coats.
The choice of finish also impacts the gloss level:
- Matte/Satin: Offers a low sheen that hides imperfections and is popular for a modern, natural look.
- Semi-Gloss: A balanced sheen, offering some reflection without being overly shiny. Often a popular choice.
- Gloss/High-Gloss: Provides a highly reflective, mirror-like finish that improves the wood grain but shows imperfections more readily.
Stain Colors and Matching Existing Wood
Choosing a stain color is a significant decision that dramatically affects your home’s overall aesthetic. Popular options range from natural and light tones to rich, dark hues.
- Natural/Clear: Improves the wood’s inherent beauty without altering its color.
- Light Tones (e.g., White Washes, Grays): Can brighten a space and create a modern, Scandinavian feel.
- Medium Tones (e.g., Golden Oak, Special Walnut): Classic choices that offer warmth and versatility.
- Dark Tones (e.g., Jacobean, Ebony, Dark Walnut): Create a dramatic, sophisticated look but can make rooms feel smaller and show dust more.
How do they affect the overall aesthetic? Lighter stains can make a room feel more open and airy, while darker stains add depth and formality. The wood species itself will also influence the final stain color, as different woods absorb stain differently. For example, red oak will have a reddish undertone, while white oak will be more neutral.
How can homeowners ensure a consistent look when matching new wood flooring with existing older floors? This is a common challenge, especially in renovations or additions. A skilled contractor can help by:
- Sampling: Applying several stain samples directly onto your actual wood (both old and new, if applicable) to see how they look in your home’s lighting.
- Custom Mixing: Blending stains to achieve a closer match.
- Feathering/Blending: When new boards are installed to patch an area, the contractor can feather the stain and finish into the surrounding older wood to minimize transition lines.
- Considering the Wood’s Age and Exposure: Older wood may have naturally darkened or faded, making a perfect match difficult but a close blend achievable.
Achieving a “perfect” match can be challenging due to differences in wood age, species, and grain. However, an experienced professional can achieve a seamless and beautiful blend.
Project Logistics: Timeline, Preparation, and Cost
Understanding the practical aspects of a floor refinishing project—from preparation to timeline and cost—will help you plan effectively and minimize disruption to your household.
How to Prepare Your Home for Floor Refinishing
Proper preparation by the homeowner is crucial for a smooth and efficient refinishing project.
- Clearing the Room: All furniture, rugs, wall hangings, and decorative items must be removed from the rooms being refinished. This gives the contractors full access to the floor.
- Removing Furniture: If the contractor doesn’t offer furniture moving, you’ll need to arrange for this yourself. Store items in another part of the house or off-site.
- Securing Pets: Plan for pets to stay elsewhere during the project and especially during the drying and curing phases, as fumes can be irritating and wet finishes can be sticky.
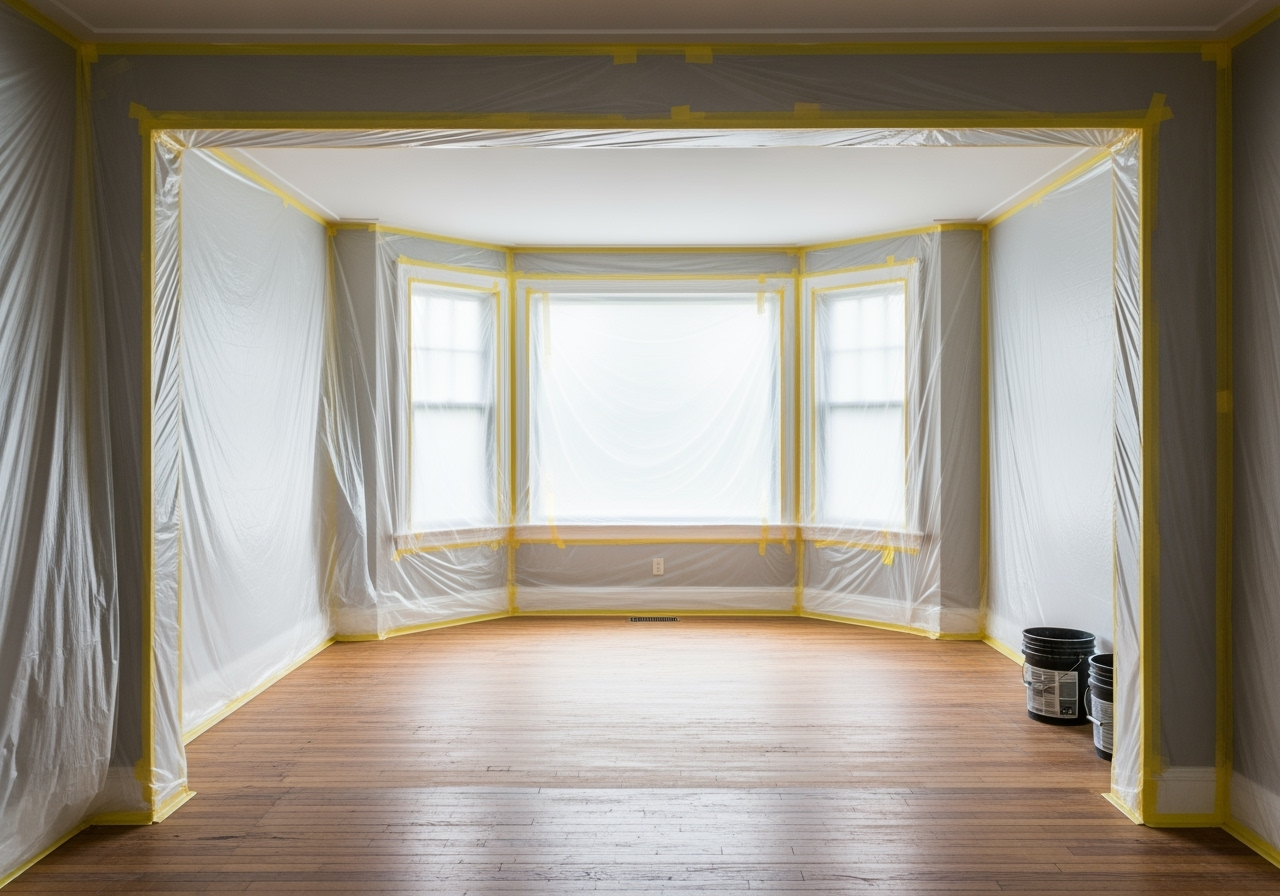
- Covering Vents: Cover HVAC vents with plastic sheeting or towels to prevent dust from circulating throughout your home, even with dustless sanding systems.
- Removing Baseboards: Discuss with your contractor whether baseboards should be removed. While optional, removing them ensures a cleaner edge and prevents damage during sanding. They can be reinstalled and painted after the floors are done.
- Planning Accommodations: Depending on the size of the project and the type of finish used, you may need to vacate your home for a few days due to odors and curing times. Discuss this with your contractor in advance.
Timeline and Cost Expectations
The typical timeline for a professional hardwood floor refinishing project depends on several factors:
- Size of the Space: Small to medium rooms (200-500 sq. ft.) usually take 2-3 days for sanding and initial finish coats. Larger areas (500+ sq. ft.) typically take 4-5 days or more.
- Floor Condition: Floors requiring extensive repairs or multiple sanding passes for deep damage will take longer.
- Finish Type: Oil-based finishes require longer drying times between coats (8-12 hours), extending the project duration compared to fast-drying water-based finishes (2-4 hours).
After the final finish is applied, light foot traffic is generally allowed in 24-48 hours (in socks only). However, furniture can usually be moved back only after at least 7 days to allow the finish to cure sufficiently. Full curing can take up to 30 days, during which time it’s advisable to avoid placing rugs or heavy objects on the floor.
How does the cost of refinishing hardwood floors compare to installing new ones? The financial benefits of refinishing are substantial.
- Refinishing Cost: Traditional refinishing costs about $3 to $8 per square foot, while dustless refinishing costs about $5 to $8 per square foot. The average cost to refinish hardwood floors is $1,900, with a range of $600 to $4,500.
- New Installation Cost: The cost to install hardwood floors is about $4,800 on average, ranging from $1,000 to $12,000. Nationally, the average cost for labor and materials ranges from $6 to $12 per square foot.
Refinishing hardwood floors costs much less than installing new wood flooring, making it a highly cost-effective solution for restoring your home’s beauty and value.
Frequently Asked Questions about Hiring Flooring Professionals
We often hear similar questions from homeowners considering floor refinishing. Here, we address some of the most common concerns.
How much does it cost to refinish hardwood floors?
The cost to refinish hardwood floors varies based on several factors, including the size of the area, the condition of the existing floors, the type of wood, the chosen finish, and whether you opt for traditional or dustless sanding.
On average, the cost to refinish hardwood floors is $1,900. However, prices can range significantly, typically from $600 to $4,500. Per square foot, traditional refinishing usually costs between $3 to $8, while dustless refinishing, which uses advanced vacuum systems to minimize mess, falls in the $5 to $8 per square foot range. This makes refinishing a much more budget-friendly option compared to installing brand new hardwood floors.
How long until I can use my floors again?
The timeline for using your newly refinished floors involves a few stages:
- Light Foot Traffic: You can typically walk on your refinished floors (in socks only) within 24 to 48 hours after the final coat of finish has been applied.
- Furniture and Rugs: It is crucial to wait at least 7 days before moving furniture back onto the floors. Heavy items, rugs, or anything that could trap moisture or prevent proper air circulation should be kept off for this period to allow the finish to cure adequately.
- Full Cure: While floors are dry to the touch and usable after a few days, the finish continues to harden and strengthen over time. Full curing can take anywhere from 14 to 30 days, depending on the type of finish and environmental conditions. During this time, it’s best to avoid sliding heavy objects, dragging furniture, or placing area rugs that might hinder the curing process.
Your contractor will provide specific instructions based on the products used and the conditions in your home.
How disruptive is the dust from sanding?
Thanks to modern technology, the disruption from dust during floor sanding has been dramatically reduced. Professional floor sanding services now commonly use advanced sanding machines equipped with powerful, integrated vacuum systems and HEPA filters.
This technology allows for 95% or more of the dust produced during sanding to be captured instantly. This means significantly less airborne dust settling on your furniture, walls, and belongings. While a minimal amount of dust might still be present, it is far less disruptive than traditional methods. Contractors also take additional measures, such as sealing off work areas with plastic sheeting, to further contain any stray particles. This commitment to a cleaner process makes professional refinishing a much more appealing option for homeowners. You can even book dust-free floor sanding service directly with many providers.
Conclusion: Making the Final Decision
Refinishing your hardwood floors is a wise investment that improves your home’s beauty, increases its value, and extends the life of your flooring. By asking the right questions and understanding the process, you can confidently choose a floor sanding contractor who will deliver exceptional results.
We’ve covered the main stages of refinishing, the benefits of dust-free sanding, crucial vetting questions for contractors, the impact of different finishes and stains, and practical project logistics. The benefits of refinishing old hardwood floors versus replacing them are clear: significant cost savings, environmental friendliness, and the ability to preserve original character.
The key is to find a professional who combines expertise with transparent communication and a commitment to quality. When you’re ready to transform your floors, take the time to evaluate your options thoroughly. For a detailed and transparent quote, schedule a free estimate with an expert team by visiting the contact page.